I am so excited to be a part of the Festival Of Hexagons. If you missed Ali’s gorgeous tutorial yesterday, make sure to head over to her blog to check out her free ‘Hexstatic’ quilt pattern!
And make sure to follow along with these amazingly talented ladies to see what other great tutorials show up over the next two weeks! There is a fun link-up party at the end with some amazing prizes. Check out Ali’s full post to see all of the how, what, and when details 🙂
Saturday, Aug. 25 Recap
I think most of you know I am a little obsessed with chevrons. Obsessed! Here is a quick little quilt tutorial to make a chevron quilt with hexagons. And this pattern is fun and simple to put together. I’ve already started another that is the reverse of this quilt to accent the chevrons!
Gather Up:
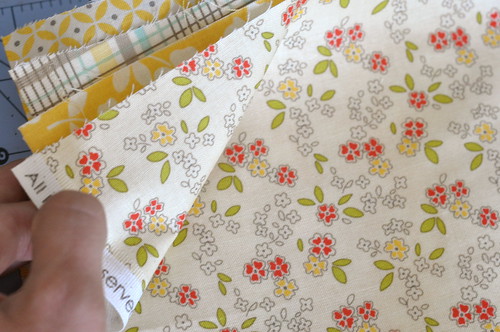
20 Different FQs (F8ths would work for the crib size) I used a Seaside FQ bundle from Riley Blake
2 Yards of solid (I used a random off-white solid from my stash)
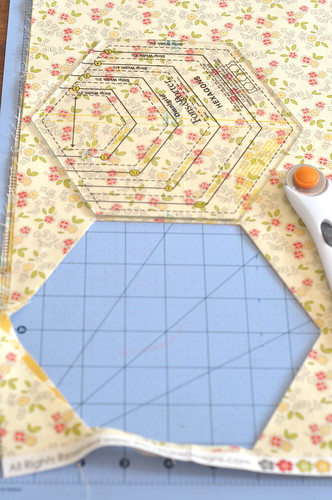
Hexagon Template Ruler (I used the inexpensive one from Jo-ann)
Rotary Cutter, blades, cutting mat
Thread, etc
Start by layering your {pressed} fat quarters 4 deep on your cutting mat.
Place your hexagon template in the bottom left corner with the flat side parallel to the selvedge

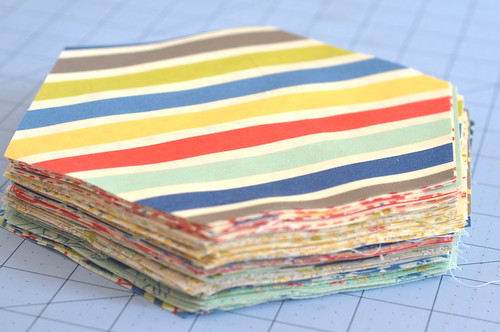
Cut your hexagons, using your rotary cutter, stacking the cuts on top of each other. I cut 5 hexagons from each print making 100 hexagons (I’m enlarging my quilt, so I am giving you what my quilt WILL finish at 🙂 )
You should have a nice little stack like this:
Now, cut your solid fabric into 2.25″ strips. Subcut into 4.5″ pieces. You need about 400 pieces.
Using your hexagon ruler again, cut 10 half hexagons from your scraps. Make sure to line the edge of the fabric up with the SOLID line on your ruler to include seam allowances.

Each finished block will measure 7″ wide by 6″ tall
For a crib sized 42″x35″ quilt you will need 33 full hexagon blocks and 4 half hexagon blocks
For a throw sized 72″ x 54″ quilt, you will need 88 full hexagon blocks and 8 half hexagon blocks (they go fast!)
Start by sewing a strip to the bottom right corner of your hexagons as shown:
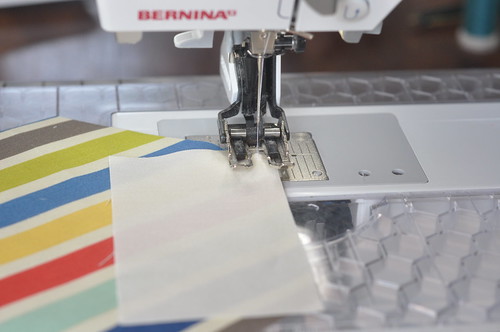
(I sew everything with my walking foot. He is my very best sewing friend!)
Repeat with each of your hexagons
Sew a second strip directly across from your first strip:
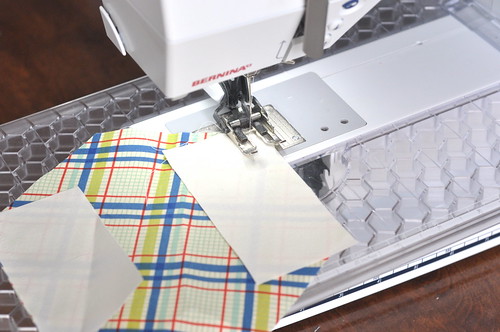
Press your seams. This is really important for a polished finish block. After a lot of trial and error, I found that I got the best look from pressing seams open. Just do what works for you:
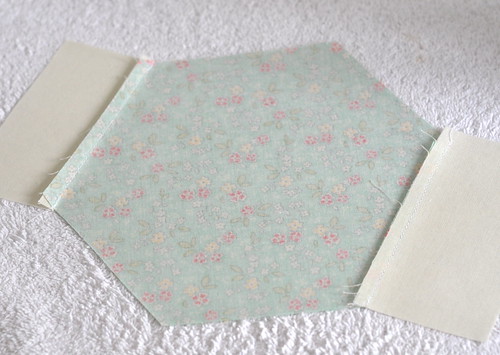
Now, go back and sew a strip on the top right corner and on the bottom left corner. Chain piecing (not stopping to cut your thread) made this go pretty quick:
Take your sewn blocks and press them again. Now, it is time to trim! I highly recommend a good show or great company while doing this part. And an icee. But that’s just me…
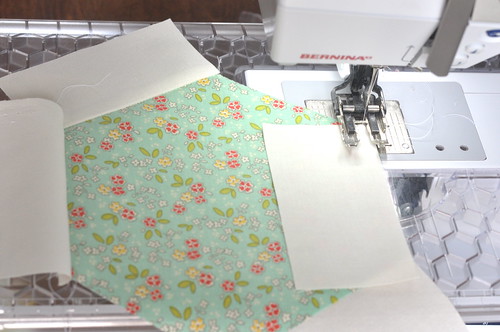
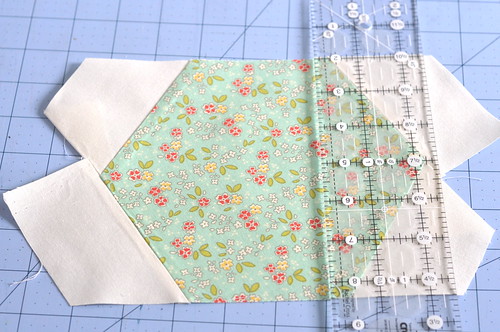
Line a trimming straight edge up with the edge of your hexagon that doesn’t have a strip attached. Trim off the overhanging pieces. In my picture I have trimmed the left side and am about to trim the right side

Now, trim the hexagons perpendicular from the edges that you just cut and 1/4″ away from the hexagon’s point (this is your seam allowance)
Repeat all of these steps with your half hexagons, but you will only need to sew 2 strips, one to each angled edge. Trim the edges.
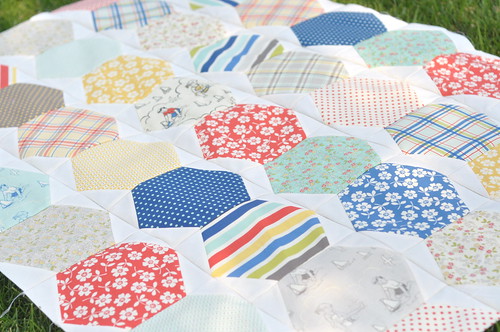
Arrange your hexagons on your fancy design, um, floor. Begin and finish with a half hexagon for every other row.

Sew your rows together starting with the side that alternates whole/half/whole hexagons

Sew your rows together and you have a hexa-chevragon quilt top!
I always love to see what you create, so if you use this tutorial, feel free to leave me a note in the comments or send me a picture!

Too cute Amanda! Love this idea!
Gorgeous and clever!!
This is so cute!!
So pretty. Love it. And what a creative name for your quilt.
Adorable! I like to do EPP, so that’s how I’d make the hexies.
This hexa-chevragon looks great! Awesome tutorial too.
So lovely!
What a great idea, Amanda, and I love that fabric line!
I love how the chevrons are like the surprise at bottom of the box! Well done! Also, I love the “manual typewriter” font of your blog. Excellent. Thank you!
Love the tutorial! Love the design! Thanks so much for sharing! I am currently making a hexagon quilt. This is great for inspiring me to make more;)
Love it. Hexy/chevron mash up heaven.
Thanks for a great tutorial, one that I’m definitely keeping in mind so I can create it as soon as my paws get that ruler.
You clever chicken! I’ve never seen a ruler like that before. I will have to keep my eye out for one.
LOve your quilt!!! Those are some of my favorite fabrics also!
What a fabulous idea. Now you have thought of it it seems I have a need for a hexie chevron lap quilt. What fun! I have a hexie addiction anyway and do all mine using EPP usually, so will be fun trying it with a machine.
I really love your tutorials Amanda! You are a great teacher..you show and explain in a way that everybody can follow! Love the hexies!
What a terrific pattern and tutorial! Flagged it for future use, have several options brewing already.
thanks for this mini tutorial. I love your quilt
fantastic quilt and tutorial! i’m adding this one to my “need to make” list.
Hexa-chevra-gon might be my new favorite word. Great tutorial, I love how this works! Adding a hexie ruler to my Joann’s list 🙂
This is a wonderful design. Thanks for the tutorial.
great method to not have to use half-hexies! Thanks Amanda! 🙂
Absolutely fabulous Amanda – you rock!!
Oh and P.S. I can’t believe I missed your birthday – happy birthday!!! I just wanted to say that I totally understand the whole tearing oneself down thing, I do it all of the time. A couple of weeks ago I was given the opportunity to purchase a ticket to Sewing Summit, after talking to both Alex and my mum (who both said I should go) I decided that I would. But then I just kept thinking how dumb and irresponsible it is for me to go when I don’t have a job right now and will have to use some of my savings to go. So, I jumped up, pitched an idea, and now I have a gig writing an article about it for a magazine! Even though the gig won’t pay me as much as I’ll spend to go, I feel so much better about it all.
I fail every single day, and I love the idea of giving yourself permission to fail and making it part of the goal.
What a wonderful way to put the hexagons together. I love the way you have done this.
Really cute quilt and a very clear tutorial. Thank you.
Fabulous!! I just bookmarked it!
I wanted to comment on your birthday post but know you closed it… I wanted to say thanks for sharing. I too have the thought of needing to be super mom plus awesome wife and fabulous visiting teacher and ……. Just thanks for sharing.
Love, love, love. Found you on Instagram and am now a happy follower. 🙂
Thank you so much for the best hexagon tutorial I have ever seen. That is just my humble opinion.
Love this! Very clever;)
This is really cute Amanda, thanks for the tute!