Has anyone else wondered about the curve master foot? Heard about it, but not really sure what the advantages are of using it? If you’ve been following along with Alyssa‘s Totally Groovy quilt along and the fabulous tutorials that have been shared by Kate and Jacquie, then you already know that there are a couple different ways to piece perfect curves every time.
I decided to put my brand spankin’ new curve master foot to the test.
I started by trying to figure out how to attach the plastic foot to my machine with the little box of adapters that are given to you. If you, like me, have a Bernina, then the answer to that question is ‘NONE’. I referred to the Curve Master site, which recommended that I purchase the ‘Ruffler’ foot for my machine and then screw the curve master foot to the ruffler shank and use it that way. Unfortunately, the ruffler foot is $130. That seems like a bit of a stretch for a more convenient way to sew curves.
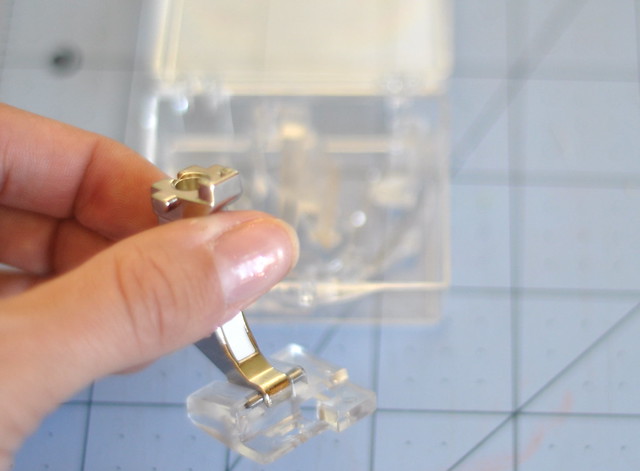
After talking with my (seriously AMAZING) Bernina dealer, they recommended I go with the $25 Bernina shank adapter. So, Bernina-ites, DON’T BUY THE RUFFLER. Unless you can use it for something else. In which case I would love to see how you use it 🙂
But, on to the tutorial! Once you figure out how to attach your cool new foot to your machine, It is time to gather up your supplies:
Curve Master Foot
Templates for your inner and outer curve
Fabric for inner and outer curve
Teeny rotary cutter to make cutting those curves go a bit quicker
Tweezers
Other sewing notions you would normally have laying around (scissors, thread etc)
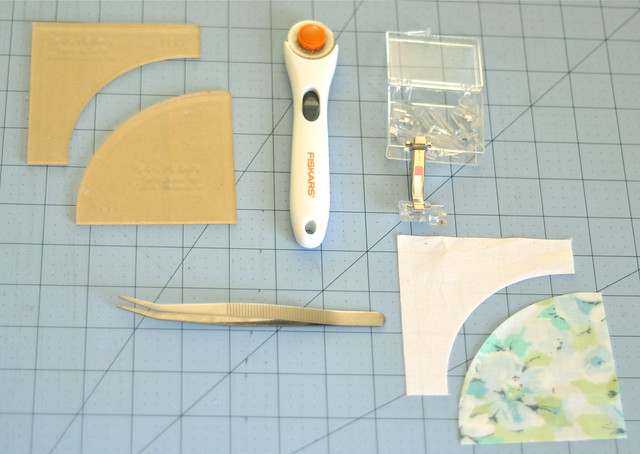
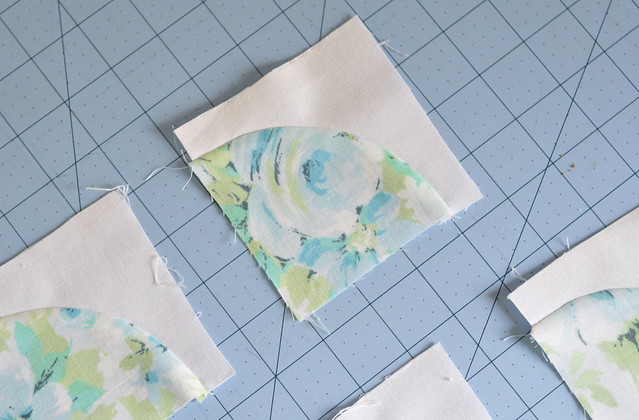
1: Cut your inner and outer curves from fabric (side note: If you have templates from the retro flower quilt along, they work PERFECTLY for the Groove quilt. How awesome is that?!)
2: Attach your foot to your machine
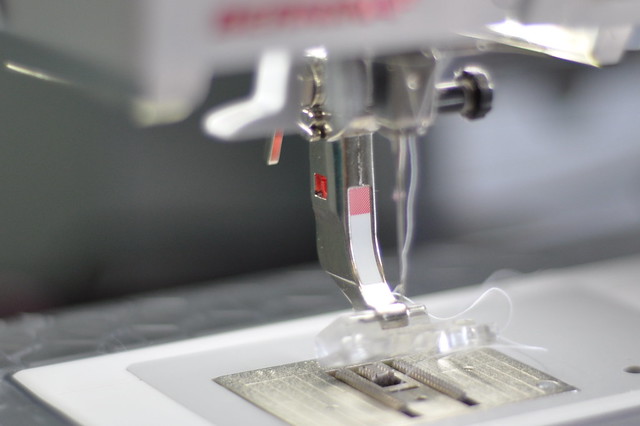
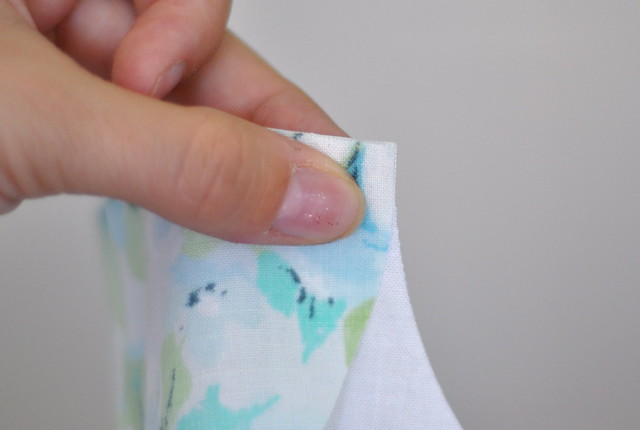
3: Lay your inner and outer curves right side up on your machine with the outer curve on your left
4: Align the top edge of your inner curve and outer curve with right sides together
5: Place your curve under your curve master foot. Make sure your outer curve is on the BOTTOM and that the edges are aligned with and touching the 1/4″ guide
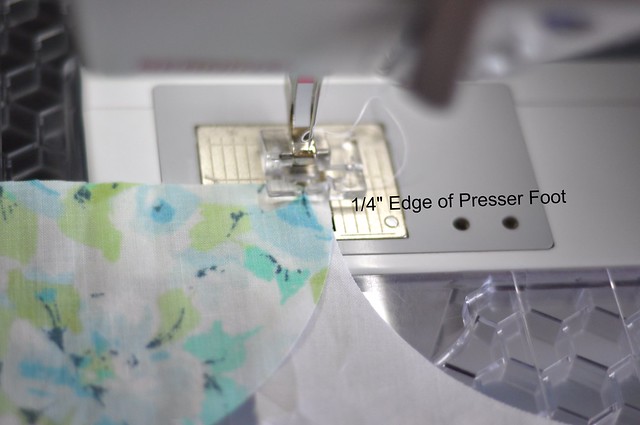
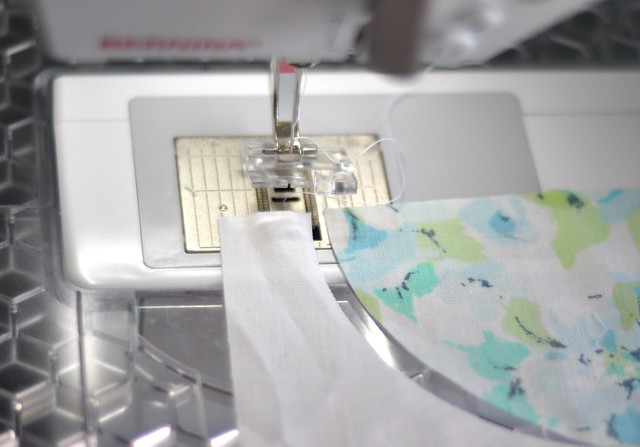
6: Knot your thread and begin sewing your curve. Don’t pull or stretch the fabric. Gently guide your inner and outercurve under the presser foot, keeping both edges touching the 1/4″ guide. I found it VERY helpful to keep the inner curve lifted significantly above the outer curve. It made the guiding easier and the seams more accurate.
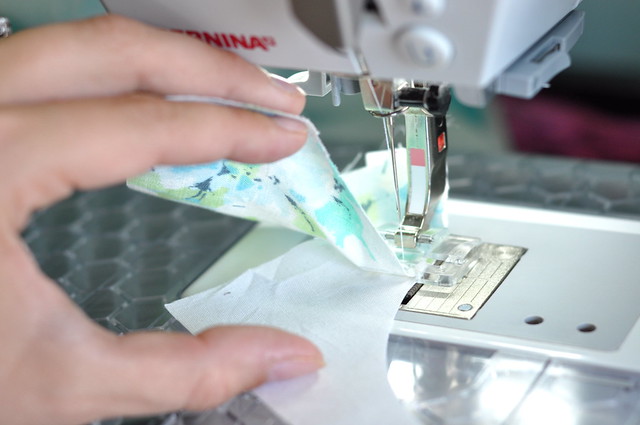
7: As you come to the end, use your tweezers instead of your fingers to guide your inner curve under the needle.
8: Press your new perfectly pieced curve. There is no need to clip, simply press the seam toward the inner curve
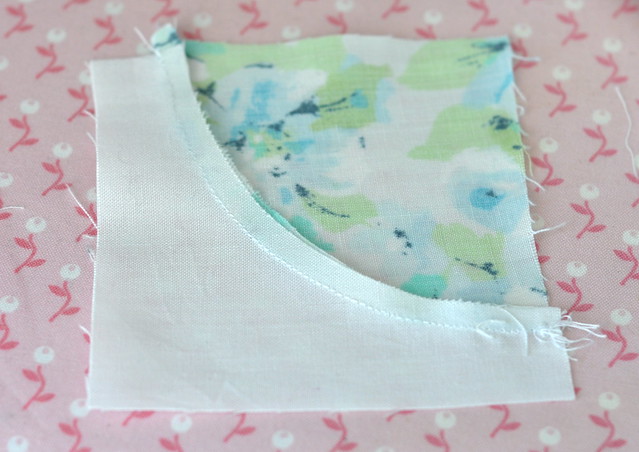
(ignore my knot – my machine and I disagreed about how it should turn out 🙁 )
9: Ta da! You have a perfectly pieced curve with no pins and very little hassle. I had an amazing sense of accomplishment admiring all of those pretty curves 🙂 By my second or third go round, these were going really fast. Anything that can save me a little bit of time is worth every penny! And the confidence boost of seeing beautiful, perfect curves makes using this foot a really pleasant experience.
If you are in the mood for a little giveaway, stop by Alyssa’s blog and see what she has been cooking up for you! (hint – it involves some adorable ‘Dear Stella’ fabrics!)

This is wonderful! I got a curve master and plan on playing tomorrow 🙂
This looks quite interesting. I had never heard of the curve master before.
I never heard of the curve master either! My biggest issue with a pinless method is not stretching the fabric. It’s a challenge!
I’ve just machine pieced 50 clamshells, it was tricky, I never knew that a foot like this existed I shall go and investigate right now – it looks like it works wonders!
This foot is new to me too! I have pieced curves for years and just pin like mad. I actually enjoy curves! Call me crazy.
I’m curious ow does the curved foot help with the curves? It is still hard for me to see that. I’d like to try one out too. Thanks for sharing.
Great tutorial Amanda! Thanks for taking the time to share your knowledge!!
I am definitely going to have to look into the curve master foot. Thanks for the advice also on the shank adapter.
Great tutorial Amanda. Although I don’t have the foot, the procedure was very interesting.
I have not had great luck with this foot. I find it easier to either pin or use my regular foot with no pins. But I am sure it is just me.
This looks so useful! I’m definitely going to look into whether they have it for my Janome.
Great tutorial.
Alyssa sent me! Great tutorial – I’m a new quilter and this certainly makes curves less scary. Looking forward to following your site!
Ooh yay! I have one of these now I just need to break it out! Side note – are you getting any more Seaside bundles in the shop? I should’ve bought it when you had one!!!
This is a great tutorial I never knew how to do this.
I had no idea that there was such a thing a Curve foot… wow!
I have never heard of this type of foot. This is so cool. Thanks for sharing.
Oh I love this curve master foot. What a neat idea. Thanks, Amanda!
My sewing machine came with lot of presser foots. Have to check if they had this one ;). That would great if it did :-).
This is a fantastic tutorial. Thank you very much. I have always have trouble doing curves, I will be trying this method real soon.
I saw a demo of this at a quilt show once. Seems like a great way to sew curves.
Great Tutorial! THANKS!!!!
lisamcgriff at hotmail dot com
Thanks for the tutorial!
What a great tutorial! I’m subscribing to your blog right now! Thanks for the great givaway with Pileofabrics 🙂
Love the curved piecing tutorial. I think that my crazy curve templates may do the trick to…just have to find them in my sewing room 😉 I think I know where it is :)???
I wanted one of these so badly! But then I discovered you can do it just as easily without it, so I spent that money on fabric instead! Yay! There is a great video on youtube showing how it’s done without any special feet or pins. It’s really super easy. Being a beginner, I thought I would struggle, but I did it! I had never sewn curves before, so I felt like I accomplished something great. Either way, with or without a special foot, it still feels great to sew a beautiful curve!
I’ve never heard of a curve master foot before!
Thanks for the tutorial!
Thanks for the great tutorial! I love the idea of not using a million pins!
That’s really interesting. I always find curves daunting.
Anything that makes curves easier has got to be good! No pins is also good, I’m constantly worried about sewing over them if I get carried away and forget to stop to remove them!
if I had this dandy little foot… I might do more curved piecing thanks for the really great posting about using it
just re-read your tutorial… I have a Brother machine… do you know if this is something that I could use without buying another adapter etc.. or how would I find out if it would fit my machine…like most folks my budget is limited…thanks
You are seriously amazing! I have a funky adaptor (which totally works) but I love that there is a Bernina one. I love your tutorial and will pull out my curve master again soon!
Hmm, my outer curve (I think) is quite a bit narrower when I’m cutting them..I’ll have to go check to see if its the template ..that’d explain why my pieces aren’t coming out quite right!
Curves always scare me, I wonder if there is something available like this for my machine…
great tutorial, thanks!
Love that the retro flower templates also work for this quilt! Thanks also for the tip about the bernina shank adapter. Great tutorial!
Wow that looks great! I need to look in my accessories to see if I have a foot for that too!
Thanks for the tutorial using a master curve foot.
Thanks for the tutorial. Great photos!
That’s pretty cool!
Thanks for the great tutorial.
Thanks for this turorial, I will definitely look into buying one for my Janome!
Wow… I am going to have to try it. Curves scare the dickens out of me, thanks for the great tutorial!
Great tutorial…will have to check this out!
I’ve been tempted to try this, and now after seeing your photo tute I might just have to do that. Thanks
Ooh I need one of those feet! I pin my curves to death and they still come out funky.
Very nice tutorial. Thanks for sharing.
Looks interesting – I’ve never heard of this before!
Thanks for the wonderful tutprial!!
I’m stopping by from Alyssa’s blog to check out your curve tutorial and am amazed to see curves without pins!
Thanks for the great tutorial! Now sewing curves isn’t quite so scary.
Interesting, thanks. I may have to get one and experiment now.
You make it look so easy. I love patterns with curves.
This is awesome, thank you! I picked up a curve master when I was on holiday but had been too scared to try it LOL! One question… why am I making a knot and how do I make a knot?
Great information – this is something I could do if I retired my 29 year old pfaff. Thank you – Wonderful!!!
I love your comments and usage of smiley faces….I think in smiley faces often and disagree with my machine daily!
Awesome tutorial. That foot is so cool!
I haven’t tried curves yet but am pinning this for reference when I do. 🙂
you make that look so easy!
HUGS FROM ALYSSA !
LOVE YOUR BLOG !
Great tutorial, Amanda. I have one of these and need to try it out again.
That does seem easy! Where do you get one of these feet?
Wow, looks easy but I don’t think I’m ready to tackle it!
What a wonderful tutorial! I think I need to get one of those feet!! 🙂
I have one of these and have had no luck with it at all. Grrr! :-/ It seems to eat my fabric at the beginning and then I can’t seem to manage getting it all lined up along the side where it’s supposed to go either. I’m going to give it another go after reading your tutorial because I desperately want to make the retro flowers quilt!
It looks simple and I’m comforted by the fact that your pieces ended up like mine do, not 100% matched at the end:)
Wow, how cool! I’d never even heard of such a thing. Your photos are amazingly clear, too – awesomeness.
Thanks for the tutorial. I’m considering an orange peel pattern as my next quilt, and this will be super handy!
What a wonderful tutorial!!!! I have been wrestling for weeks
with some miniature (2″) drunkard’s path blocks. I have been
doing them by hand. It is just tough….I will do two or three
at a time, then put it away for a while. Just hate all that
pinning, and fighting with the fabric!! This looks like a real
lifesaver. I will definitely have to do this!!!!!! Thank you
so much!!!!!!!!!!!!
That is a pretty nifty foot! It would be a fun one to try. I’m loving the no-pins curve piecing for Groove since I don’t have the Curve Master 😉
Great tutorial. I absolutely agree with you about the Curvemaster foot–mine makes me feel like a genius!
Thanks for the tutorial, do you think the overall idea would work with a normal presser foot and doing it very very slowly? Love the groovy quilt but a bit too scared of it and all its curves yet.
I’m stopping by to say, “Hi!” from Pile O’ Fabric. I looked in your side bar, but did not see a way to follow your blog via email. Did I miss it?
Deborah
homemakerhoney @gmail .com
Thanks for the demo. I have been wondering how good this foot is.
Great tutorial. Thanks, Peggy
Thanks for a great tutorial!!
you make seem this soooo easy, I have a quilting foot is it good as well? or do I need a transparent one?
thanks for your tutorial and for the chance on the giveaway too =)
Cool foot, I’ll see if my LQS has one to match my sewing machine.
What a great tutorial!! I’ll have to look into a foot like that for my machine. 🙂
Very cool…looks like a great notion to have!
That seems simple enough. Awesome job!!!
Thanks for the great tutorial! Will use!
I’m going to visit my Pfaff dealer in Paris on Monday to see what kind of fancy presser feet they have for me! Thanks for the great tutorial Amanda! Love your blog =)
I have this foot and use it often. It works great and makes doing the curves so easy. Thanks for the tutorial.
Thanks for the great tutorial. I’ll have to check this foot out!
Love the tutorial. The president of my quilt guild was telling us about the curve master foot and I’m so glad to see how it works! 🙂
Thank you for the great tutorial!
Thanks for the excellent tutorial. I’m gearing up to tackle some curves despite my fear.
Thanks for the great tutorial.
Thanks for the great tutorial. This sounds like a useful presser foot.