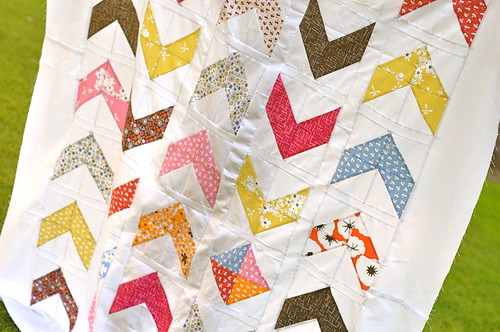
Remember my gorgeous pile of Madrona Road scraps? Would you believe they became a twin sized quilt?
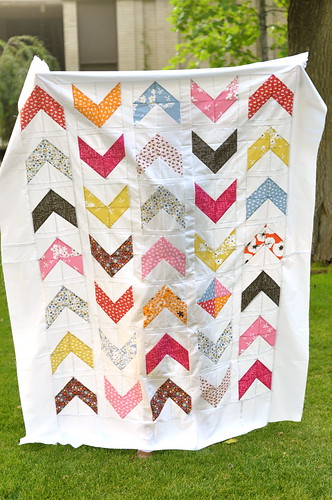
I’ve been playing with my chevrons from back here. And I found that once I had them pieced and the seam allowance factored out, they were just too squished together. The gorgeous prints didn’t ‘pop’ like I had hoped. They kind of became a jumbled mess. So I ripped them apart and sewed 1.5″ sashing to every chevron. The difference is amazing. I wrote up a little tutorial for this so you don’t have to sew a TON of sashing onto your easy chevrons. So, let’s get started, shall we?
For this quilt, you are going to need:
35 matching pairs of 5″ charm squares (I’m using Madrona Road. It will arrive in my shop in just a few weeks! So.Excited.)
3 yards-ish of your favorite solid (mine is white – can you tell?)
thread in the same color as your solid
normal sewing necessities like scissors, sewing machine, rotary cutter and mat, iron and ironing board etc)
From your solid fabric cut 70 5″x 6.25″ rectangles. I did this by cutting 5″ strips and then sub-cutting those at the 6.25″ mark.
Then cut 6 6.5″ strips and 6 2.5″ strips. Set these aside for sashing and borders at the end.
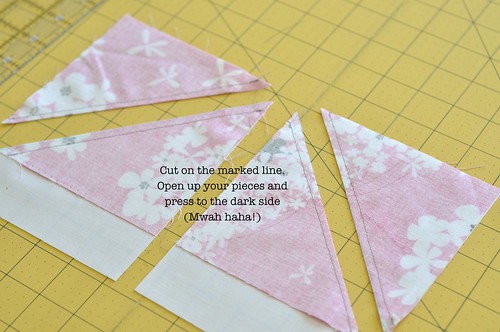
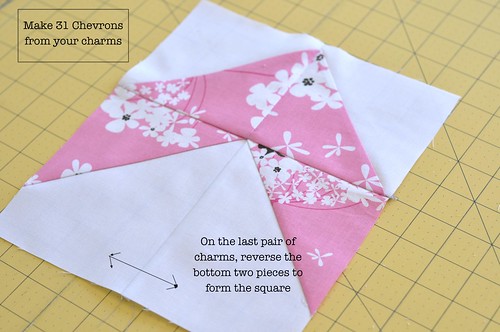
Mark your 5″ charms with a line diagonally from corner to corner, just as you would for half square triangles

Lay your charms on on top of your rectangles, lining up the top edge and right sides together


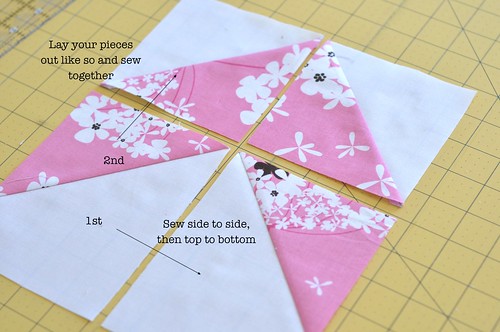
All right, are we all together? This is my first time using pictures with words on them. What do you think? Is it easier to follow along?
All right, onward and upward. Let’s lay out our blocks on our fancy pants design wall – er – floor.
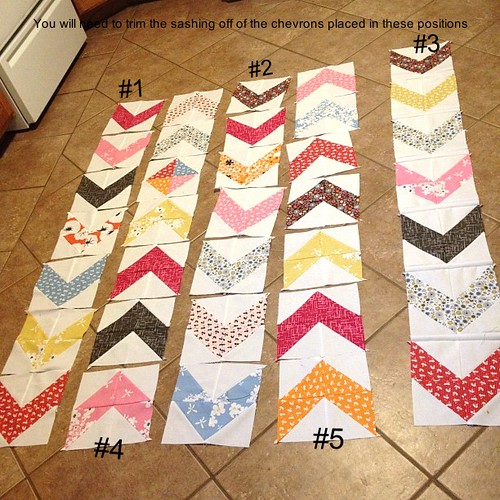
Please notice that you will need to trim 1.25″ off of the chevrons that you choose for the positions marked 1-5 in order for your chevrons to line up like they do in this quilt.
At this point I highly recommend taking a picture (or three) of your layout. It can help you spot when colors are bunched and when you decide you like it, you can always pick up your blocks and put them back together again without all of the fuss or rearranging again.
I sewed mine together in strips (like you see on the right) and then sashed them with the 2.5″ strips of my solid. For the borders, measure each side (Right and Left) of your quilt. Average the two numbers and create 2 border strips that length. Attach. Measure top and bottom, average the two numbers. Create 2 border strips that length. Attach. Baste, Quilt, and Bind as desired!


Nice! Thanks for sharing!
LOVE this! Can’t wait to try it myself..the fabric is awesome!
Such a pretty quilt and yes, this makes the colors and fabric pop. Great tutorial Amanda!
I love your take on chevrons! Thanks for sharing!
LOVELY!! I love the fabrics (I’ll definitely be looking forward to those coming to your shop!) and love the way you did this. It looks different and gorgeous! Can’t wait to try it out! Thanks!!
I just love the way it came out!
Really great tutorial and love that one little block that’s different!
Hi there – I love this quilt, but I’m a little confused. On your photo “Chevron 7,” it shows that there’s an inch or so of neutral below the bottom of the chevron, the purpose of which I understand is to eliminate the need for the thin sashing between rows. But in your “design wall” and finished photos of the quilt, that’s not there. But if you offset the chevrons like you’re doing in your quilt, they’ll be a little wonky. The top of one won’t line up with the bottom of the other. Follow me?
Wow! I like the use of HSTs. Looks a lot like Cluck Cluck Sew’s pattern: http://www.cluckclucksewpatterns.com/2012/04/pow-wow.html
Oh my gosh, Amanda, this is beautiful!! I absolutely have to make one these quilts! I love Madrona Road too and am hoping to get my hands on some when it comes out. We’ll see if I can talk my husband into giving me a little splurge. 🙂
Awesome and clever!!
I love this quilt. Thank you for posting a tutorial (I’m pinning it to my quilts board: http://pinterest.com/iftoyscouldtalk/quilts/). I’m looking for some inspiration for a twin quilt for my little guy, and this is an awesome option! 🙂
Very cute quilt and awesome way to avoid all the sashing. Thanks. You always have such great ideas!
Gorgeous!! I love your blog, can I just say? You’re inspiring me to get back on the craft bandwagon and start posting my own stuff again… it’s been awhile. Thanks for the inspiration (and I love this font as well–what is it?) Happy quilting, hope you have a great week! Can’t wait to see your first quilt! 😉 {I kept my first “scarf” I knit years ago to show those I teach… just to remind them it does get better, haha…}
What a great pattern! I love the fabric!
Hi! I love this and want to make it soon, but just to double check, you list 32 pairs of 5″ charms in your fabric requirements, but the finished quilt has 35 blocks. Should it actually be 35 pairs of charms and 70 solid pieces or am I missing something?